
Logging in to your newly migrated site
You should have received a login link now your site has been migrated to the Fresco platform. The format of the login link is the same across all Fresco sites - shortcode.site.ox.ac.uk/user - your short code in Fresco will be the same as your Mosaic site. So, if your Mosaic site URL was chemistry.web.ox.ac.uk, then your new Fresco URL will be chemistry.site.ox.ac.uk
In your browser, go to your login URL - shortcode.site.ox.ac.uk/user
From there, you will be prompted to sign in using your university Single Sign-On (SSO) - you may have already logged in to your SSO elsewhere, so you may see a handful of redirects before successfully being logged in.
Adding users to your new site
During migration, only the Site Owner's account (and the Migration Contact, if defined) is carried over from Mosaic to Fresco. All other editors and managers from your previous site must be manually added to restore their access
As the Site Owner, it is your responsibility to add any new users to your site because Site Owners hold the Site Administrator role, which is the only role permitted to add, edit, or delete users
Find the Administration/Admin Ribbon on your page. Refer to the screenshot below - the Ribbon is highlighted grey (but will be white on your page).

Administration/Admin Ribbon
Header
This a key part in the process. The header contains the main navigation/menu, that helps visitors easily navigate your site, and it’s the first thing most visitors will see.
From the Admin Ribbon, please go to Settings > Header and Footer.
Scroll down to the existing header and footer content section. You should see two separate items; Default site footer and Default site header. For now, let’s click the Edit button on the Default site header.
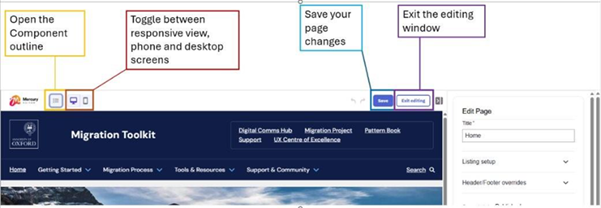
This will open two panes – the Edit Pane on the right-hand side, and the Page Preview pane on the left-hand side.
Tip: You can resize the Edit Pane by dragging its left edge if it feels too narrow.
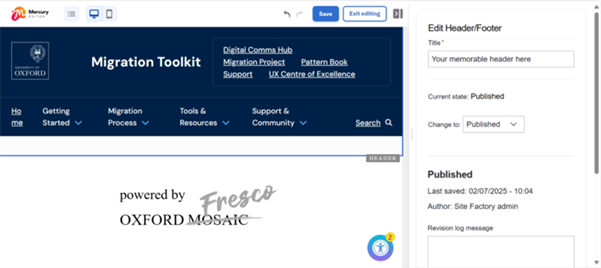
Edit Pane
Optional: In the Edit Pane, update the Title field and choose something memorable. As this will be for your/site editors' reference, it can just be an abbreviation of your website title, followed by ‘header’. Note: Headers and Footers are stored in the same place, so including the title will help you identify them.
Then, in the Page Preview Pane, click on your Header – after clicking, you should see a blue box appear around the Header Component and a small, blue toolbar.
With the Header Component now selected, select a layout. You have three options: Standard, Microsite or Department Header.
In the Edit Pane, select the Content tab. In the Header Title field enter your Header text. This will be visible across your entire site.
Optional: To add your custom logo, select the header component, then hover and click on the blue, outlined image box next to the OU logo – you should see a toolbar appear, labelled Image. While hovering over this box, you should see a plus icon (+), click that and a modal will appear that will allow you to select an existing image from the media library or upload a new one. After selecting an image, make sure you click the Apply button on the modal. You should now see your image appear in the Page Preview Pane.
Menu
You can also assign the migrated menu for your site using the drop-down labelled Menu. Inside this dropdown, you will see three options to choose from: Main navigation, Quick links and a third that will have the same name as your site. If you want to use the migrated menu, select this one.
To edit or add a page link to your menu, in Settings and select Menus and edit the menu you want to update. To add a new link to the menu, select Add link or to edit an existing link click Edit.
In the new window, enter your menu link title - this is the text that will appear on your website. Then start typing your website's title in the Link field. This will auto-populate with published pages, so you don't need to paste in the URL. You can also select the Parent link, which is where this menu will appear under. Once done, click Save.
You can also re-order your menu by dragging and dropping the menu list.
When you're happy with your menu, click Save at the bottom of the page.
If you are happy with your Header, make sure to deselect everything (you can do this by clicking within the white, empty space below the header and either side of the ‘powered by Fresco’ logo), view the Edit Pane, locate the ‘Current state’ field and if it doesn’t already say it is ‘Published’, then update its status to Published.
Click Save in the Admin Ribbon, followed by the Exit editing button in the same area.
You have now configured your header. You only need to do this once per site.
Footer
From the Admin Ribbon, please go to Settings > Header and Footer.
Scroll down to the existing header and footer content section. You should see two separate items; Default site footer and Default site header. For now, click the Edit button on the Default site footer.
This will open two panes – the Edit Pane on the right-hand side, and the Page Preview pane on the left-hand side.
Tip: You can resize the Edit Pane by dragging its left edge if it feels too narrow.
Optional: In the Edit Pane, update the Title field and choose something memorable. As this will be for your/site editors' reference, it can just be an abbreviation of your website title, followed by ‘footer’. Note: Headers and Footers are stored in the same place, so we recommend using titles so you can easily recognise them. In the Page Preview, update your footer. It is up to you which content you would like to create, edit or remove:
- Site logo – The default footer will come premade with the OU logo in this area. If you would like to change this to your own custom logo, select the image component and you should see the Edit Pane on the right, change to your image editing options. To choose a new logo, you need to remove the current one, by clicking the small ‘X’ on the existing image, then Add media to upload or select an existing image from the media library. Click Apply.
- Site address – This area has some placeholder text in on the default footer, you can change this to your own address by selecting the text component, then using the Edit Pane to change the content.
- Icons with text/links – This area has two examples of an icon component in by default. You can remove them by selecting them and then clicking on the bin icon. To customise them to your liking, select one at a time and then the Edit Pane should update to show your Icon editing settings. In the Icon field, if you would like to change to a new icon, simply empty the field and then start typing an icon you would like to use (e.g ‘facebook’), and you will see previews of the resulting icons – click the icon you would like to use. The field Icon Text is the text content that appears next to your icon – simply update this field to update your text in the Preview Pane.
- Button (for call-to-actions) – You can remove this if it is not relevant by selecting and then using the bin icon. You can also update this to fit your own purpose – select the button component, the Edit Pane should then update to show your Button editing settings. Text field is the text shown to the user, the Link field is where you would either search the name of an internal page and then select from the results, or you can paste in an external link in here too. The Button component also has the same icon settings as the Icon component.
- Site links – There are three additional columns within the footer component. Each column consists of a heading component, followed by a text component. These columns were built with housing the important site links in mind – a heading for each column, followed by a list of important page links. However, it is up to you as a website editor if you wish to use this area or not.
Towards the bottom of the Footer component is a section/row for social media links and their respective logos. To update these, make sure the footer is selected and then:
- Text – The default Footer will have the text ‘Connect with us’. If you’d like to change this, simply click on the text component with that text and the Edit Pane will now show the edit settings for this component. Here you can edit the content of the text component.
- Icons – This is housed in a special layout option called a Flexbox. You will need to have the flexbox selected to then select the individual icon components within:
- Click an existing icon component – the Edit Pane will now show the icon component editing settings.
- As you did with other sections within the footer, you can change the icon to your choosing by emptying the Icon field and then start typing the name of an icon you would like to pick – then pick the icon you’d like from the preview results that show.
- Each icon component also has its own Icon Link field; this is where you put the desired destination link when users click on each icon.
- Repeat for each required icon or logo.
If you are happy with your Footer, make sure to deselect everything (you can do this by clicking within the white, empty space below the footer and either side of the ‘powered by Fresco’ logo), view the Edit Pane, locate the ‘Current state’ field and if it doesn’t already say it is ‘Published’, then update its status to Published.
Click Save in the Admin Ribbon, followed by the Exit editing button in the same area.
You have now configured your Header. You only need to do this once per site.
Reviewing each of your site pages
You now need to review each of your site pages methodically to ensure you are happy with all the content and how it has migrated over from Mosaic to Fresco.
As every site is different in terms of the types of components on each page, we cannot provide an exact ‘one size fits all’ guide. In place of that, this section is a component-by-component guide that you can refer to when going through each page and you come across each component.
Below is a screenshot showing some buttons and tools which you will use a lot, during your ‘spot-checks’ of each migrated page.
Button and tools
In the Admin Ribbon, click Content. It will open a page with a paginated list of all pages on your site.
Open each page and carefully review them – look out for content mismatches and fix them where necessary.
Tip: If you want to edit a batch of pages, you can open multiple pages in a new browser tabs. Hold CTRL (Windows) or Option (Mac) and click on a page title (from the Content page list, or right-click each and choose Open in New Tab.
If any pages do not look quite right, click Edit. The edit button can be found at the top of the page in the Edit Ribbon (highlighted in orange below).

Edit Ribbon
Fixing and tidying page layouts
Editing specific components
Pages are constructed with components (in Mosaic, these were called Widgets), with each component allowing you to present your content in a variety of different formats.
This section will introduce you to and guide you through each of the components that are currently migrated, so that you can edit your pages with ease and efficiency.
Sections
Pages are made up of Sections (a layout type), and Components (except Banner) must always site within a Section.
When you are in the edit page, you will see two areas – the Page Preview on the left and the Edit Pane on the right (See screenshot below).
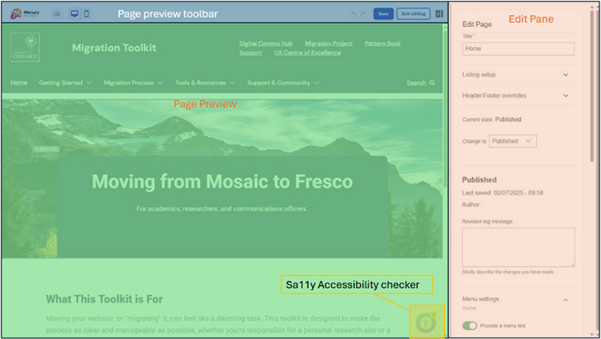
Page Preview toolbar and Edit Pane
To edit a component, you must first select the section it’s nested in – when you hover over things in the Page Preview, you should see a small indicator next to your cursor, telling you what you are hovering over.
If you want to edit a component, simply click on the section it’s nested in, and then click on the component you would like to edit – you will now see the Edit Pane has changed to show editing settings for that component.
Any changes you make to a Component in the Edit Pane will update in the Page Preview almost immediately – meaning, you can see your changes ‘live’ before publishing them.
When you click on a Section you will be given editing settings to change the number of columns inside each section. It is up to you whether you want to keep the column layout or add some more.
To add a new Section, click on an existing Section, and then click on the plus (+) symbol Add section that will appear below the tool bar. The Add section button at the top, will add a new Section above the selected Section. The Add a section button at the bottom, will add a new Section below the selected Section.
For the sake of styling consistency (too much blank/white space), we recommend that you delete any sections that are do not contain any components.
Headings
With the parent section selected, select the Heading component.
Fresco doesn't allow heading components to be used one after the other. We recommend only using one Heading component per page and adding each subheading via the Text box.
In the Edit Pane:
Content tab:
- Text: The content to be shown in the heading component
- Heading Tag: Change heading size/tag (H1, H2, H3 etc.) There should only be one H1 heading per page, for accessibility and search best practices.
Styles tab:
- Text alignment: Left, centred or right alignment
- Anchor link: Where you can set up an anchor link, (which can be linked to elsewhere on the site) once clicked, it will bring the user to this page and scroll their screen down to this specific component.
When inserting your Heading component, by default it will go full width across the page - this is normal. Adding a different component beneath your Heading will move it into your column.
Text
You may be familiar with Mosaic’s WYSIWYG (‘what you see is what you get’) which was used for standard text editing.
The key difference in Fresco is that text and images now have separate dedicated components, which may take some getting used to.
With the parent section selected, select the Text component.
In the right-hand Edit Pane, use the toolbar to fix styles or formatting in your text (eg. bullet points, small fonts, white backgrounds). Highlight the text and click clear formatting (Tx). You will also need to do this if the text has been copied and pasted.
To create subheadings, highlight the text and select the option (H2, H3, H4 etc) from the Paragraph dropdown menu.
Tip: You can click the Maximise button to open the text editor in a larger window - it looks like four arrows, pointing outwards and can be found in the very-left side of the text toolbar.
Good to know: During migration, any images in Mosaic that were added via WYSIWYG will still be inside the Text component. You can either leave these as they are (if you are happy with how they’ve been migrated), or you could add a dedicated Image component and transfer/move the image into there.
The Accordion component
Fresco does not currently support multiple columns inside accordions, but does support the heading, text, button, and image components.
With the parent section selected, select the Accordion component. You can include an Anchor link for the Accordion if you wish. If you don't want an Anchor link, leave the field blank and select 'Apply'.
You can edit titles of each accordion by hovering over the title you wish to change and using the pencil icon.
To add a new component to an Accordion, ensure the blue arrow to the right of your accordion is facing up, and hover over the area below your Accordion title and click the blue plus icon to Add Component to Accordion.
Repeat for each Accordion.
To add a new Accordion, hover over the component and select Add Accordion Item. This will appear in the bottom left-hand corner of the componene
You can reorder your accordions by dragging and dropping the title (you will see a blue bar showing the new position).
Fixing menu links
If links in your Mosaic site menu had the full URL’s that pointed internally, after migration they may still be pointing to your old Mosaic site.
To fix them:
In the Admin Ribbon, click Settings, then click Menus.
Find the menu that is labelled the same as your site name (this is how menus are migrated) and click Edit menu on the right-hand side.
Find any broken links pointing to the old site. You can do this by hovering over each menu link title and see if this is still directing your readers to the old Mosaic site (hover over a link and see the URL in the bottom left of your browser). If the link includes ‘.site’ then the link has migrated successfully, if the link includes ‘.web’ then it’s still pointing to your Mosaic site and needs to be updated.
If you find any menu items still linking to your Mosaic site, click the Edit button on the right-hand side of that item - delete any text in the Link field.
In the same Link field, start typing the correct Fresco page name and select the correct suggestion. You don’t need the full-page URL, just the page name so that the platform will then create the relative, internal path for you. Click Save after you are happy with this link.
Repeat for any other broken links.
When you are happy with your menu links, click the Save button at the bottom of the edit menu page.
Accessibility
Use Fresco’s built-in Sa11y tool
Fresco provides an accessibility tool called Sa11y (Sally), which highlights potential accessibility issues for all content managers to use.
You can toggle Sa11y on or off when you are editing any content type – You will see the Sa11y icon appear in the bottom-right of any Preview Pane when editing content. When toggled On, you will see warning/recommendation boxes show on your page if there are any actions that the tool recommends. Some warnings may be redundant and irrelevant but it’s always best practice to check each page with the Sa11y tool before publishing.
Below is a screenshot, showing the warning/recommendation boxes when Sa11y is toggled On and it finds something to flag:
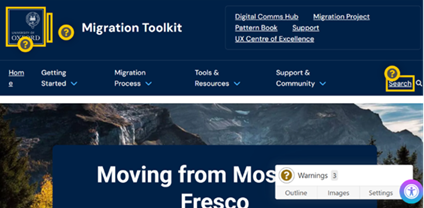
Sa11y tool
Next steps
Once you have reviewed and cleaned your content, please make sure that you:
Contact us, to let us know and confirm the following:
- Your site has been checked, and you are happy to go live.
- If applicable, check your local governance processes and ensure the site’s been approved by any necessary approvers.
- You are happy for your Mosaic site to be ‘turned off’ and redirects put in place (for four months) to redirect visitors from your old Mosaic site to your new, migrated, Fresco site.
- If applicable, you are happy for your custom domain (not including ‘.web’ domains) to be applied to your new, migrated, Fresco site.
- Ensure you keep a copy of your Mosaic site (if applicable) as you will not have access to your Mosaic site once your Fresco site is live. Learn more about decommissioning and archiving Mosaic content.
- If there was anything that this guide did not tell you, that you think it should have.